Skip to content

Factors You Need to Consider in Choosing the best wine cooler

Choosing the best wine cooler

What is a wine coolers machine?

A wine cooler is any of several appliances intended to chill wine quickly and keep it cool. A modern countertop beverage cooler can be used for this purpose, but it will not maintain the optimum temperature range long enough for most wines.

Doing so without affecting its taste is difficult; even professional sommeliers cannot do this with complete consistency. The traditional approach would be to use an ice bucket with either ice or a mixture of ice and water, let stand until chilled, then serve from within the same container.

Manufacturers claim that their appliances allow one to serve wine between 38°F (3°C) and 50°F (10°C), depending on the model. Some models also incorporate a vacuum pump in order to remove oxygen from the container.

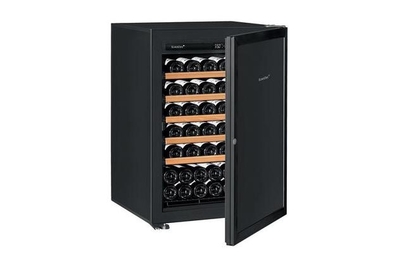
The machine that chill wine bottles can be used at home and has a storage space to accommodate up to 24 standard size bottles, making it very convenient for the users to use it anywhere at any time.

It also make an attractive and elegant addition to one’s bar or dining room as well as other rooms in the house like kitchen and bedrooms where you want your guests and family members who come visiting you always remember you for your excellence taste in wines because of using this marvelous machine .

Factors to Choose When Buy the Best Wine Cooler

The following are factors you need to consider in choosing the best wine cooler.

1. Size

First, consider the size of your wine cooler. You can find out what size would be appropriate for your home by checking the cubic area (CA) needed for a particular model.

For example, if you want to buy a single zone wine cooler which has total CA up to 60, make sure that this product will fit in your surroundings; otherwise it would make no sense since either you would have difficulty placing it or come to think of it- why did you even bother buying it in the first place!

However, keep in mind that larger units may not have enough gasket space against adjacent wall surfaces for sealing which could eventually lead into temperature loss.

2. Temperature range and control

The next thing you should look up for is the temperature range which can be found on product specifications. For example, some wine coolers may only go as low as 50 degrees Fahrenheit while others could drop lower than that down to 20 deg F.

It also depends on what types of wines you are trying to save in your unit. According to Real Gastropub, optimum storage for red wines ranges from 55 to 65 degrees Fahrenheit whereas white wines need it typically at 45-55 deg F.

As far as controls are concerned, it is best if these are digital rather than analog dials since they would provide better accuracy plus convenience. Furthermore, a good touchpad interface allows you to set specific settings based on the type of wine you are trying to preserve.

3. Thermoelectric or compressor cooler?

For thermoelectric wine coolers, make sure that they are Peltier devices otherwise their performance would be severely affected since there is no way it could operate without a fan inside.

On the other hand, for compressor based coolers, make sure that its size corresponds with room size to maximize energy efficiency. However this will not have much influence on temperature fluctuation which can be 5 deg F for every 10 minutes of running time in case unit operates at maximum capacity.

As far as noise level goes, compressor units tend to produce more noise compared to thermoelectric ones since they have two fans plus refrigerant line inside.

4. Temperature fluctuation

When considering the factors to choose the best wine cooler, you should look up for its ability to maintain a steady temperature inside.

For instance, if you are planning to store red wines at 55 deg F then your unit should be precise down to at least within one or two degrees in order not to affect taste of contents. On the other hand, for chilling white wines, it is better if their temperatures are set below 50 deg F since they can easily get spoiled when exposed under warmer conditions which would accelerate aging process.

As for flavor-influencing factors, make sure that there is no way for light or vibration to reach bottles since these could break cork seal weakening wine over time.

5. Noise level

Finally, you should take noise level into the equation. First, make sure that there is no sound when your wine cooler starts and stops since this could affect its performance.

Second, compressor units tend to produce more noise compared to thermoelectric ones because they have two fans plus refrigerant line inside which contributes to overall ambient noise levels.

Therefore, you should look for units having advanced insulation technology such as foam-in-place gaskets around doors and panels with high density insulation material within frame structure in order to minimize or even cancel out any unwanted noises coming from inside. Good luck!

Factors to Consider When Choosing a Wall Oven

Choosing a Wall Oven

Wall ovens come in a variety of sizes, styles and features. Whether you’re buying a wall oven for the first time or replacing an older appliance, it’s important to know what type will best suit your cooking needs. In general, there are four types of wall ovens: self-cleaning; single- or double-oven configurations; gas or electric models; and whether they have convection capabilities. Each style has its own pros and cons that should be carefully considered before purchasing one.

Considerations When Choosing a Wall Oven

Cost Range

Wall ovens aren’t cheap, and can cost anywhere from $500 to $3,000 or more. For the best performance and most features, plan on spending at least $1,000. If you’re simply looking for an affordable option that gets the job done, aim for below $500.

Size

Before purchasing a wall oven, measure your available space carefully. Most standard-sized wall ovens accommodate four to seven standard (12-inch wide) cooking racks; however there are double versions which can hold twice as many. If you frequently cook with large roasting pans or sheet trays, opt for a double wall oven with five racks per side instead of just the usual four .

Single Versus Double Oven

Many wall ovens come equipped with two compartments instead of just one. These appliances offer more cooking options because they allow you to bake different foods at different temperatures in each compartment simultaneously.

An added bonus is that you won’t have to heat up an extra oven just to bake a cake or roast vegetables. Two-compartment ovens tend to be slightly more expensive than single oven models, but they can be worth it if baking multiple dishes at different temperatures is important to you.

Self-Clean Versus Manual Clean

Most wall ovens are either self-cleaning (heated by electricity) or manual (heated by gas). A self-cleaning oven uses electric heating elements strategically placed within the interior walls of the appliance for quick and even heating of the air surrounding food during this cleaning mode.

This process involves high-temperature, pressurized steam that leaves surfaces sparkling clean. Some designs use infrared lights instead of steam for fast results. The downside to a self-cleaning oven is that it runs on electricity, so you’ll need to factor in the additional costs of running this appliance when deciding whether or not it’s worth the purchase .

Manual wall ovens don’t necessarily require fuel. They rely on hot air and steam produced by natural gas or propane for their self-cleaning mode. Natural gas and propane both burn cleaner than electric, which can help minimize smoke and odors in your home when cleaning your oven.

Gas models tend to be more expensive than electric models because they’re less common; however, prices will vary depending on where you live. If cooking with an open flame doesn’t appeal to you, consider purchasing a manual wall oven with a built-in fan that reduces the amount of hot air required to produce steam .

Fuel Type

The choice between gas and electric ovens largely depends on personal preference. While many homeowners prefer natural gas because it’s more environmentally friendly, electric wall ovens are less expensive to purchase, run cooler (reducing the risk of fire) and use less energy than their gas counterparts. Before you decide which type is right for you, consider your cooking habits.

If you cook with a lot of meat or other fatty foods, for example, an electric model will operate at higher temperatures than a natural gas wall oven. This can help remove grease from foods more quickly. To avoid unpleasant odors during your next self-cleaning cycle, choose an electric model that includes a built-in fan.

Convection

Once you’ve settled on the basic type of wall oven you’d like to purchase, consider if convection is right for your cooking needs. Convection ovens cook not only with the heat from their primary electric or gas elements, but also with hot air blown around by a fan.

The result: food cooks more quickly and evenly than in traditional wall ovens. If you often find yourself rushing to get dinner ready before everyone arrives, consider purchasing a convection wall oven. You may even find that some models feature both self-cleaning and convection capabilities .

Ease-of-Use Features

A variety of control options available on modern wall ovens can make cooking easier for you. Some models come equipped with a built-in temperature probe, which lets you set the correct temperature for your food and monitor its progress remotely. Touchpad controls make it easy to navigate through oven modes; some even let you customize settings like how often the oven beeps or chimes when an alarm goes off. If your kitchen is short on space, choose a wall oven that has reversible doors. This way, no matter where you place your oven in relation to surrounding cabinets and work surfaces, you’ll have access to the door.

Controls and Settings

Most modern wall ovens give you control over not only heat but also other cooking factors like time and moisture levels Many include preprogrammed settings that use an algorithm to calculate the optimal cooking parameters based on the food you’re preparing.

For example, if you’re baking a casserole, your oven may use its heat sensor to keep track of how quickly the dish’s temperature is rising. If it senses that your meal is taking too long to cook, it will automatically switch from bake mode to broil or another high-temperature setting.

Dream Create

How to Season a Nonstick Pan: Here is everything you need to know

This article about “How to Season a Nonstick Pan”, read more

Minimal oil and limited cleaning job after preparing sticky foods is the norm when using nonstick pots. They are life savers for many. Stir-fried veggies, pancakes, and omelets slide right off the surface of a nonstick. However, after a while (months to years), the pans lose their touch.

Nonstick Pan

While the longevity of the Teflon coating has come a long way in the last couple of years, the pans begin to perform less effortlessly than when new. As such, the pans need to be seasoned, to restore their non-sticking properties.

Traditionally, seasoning has been associated with cast iron pans. However, because of the same reasons, manufacturers propose that you season you nonstick pans twice in a year. With time, oil and food particles inhibit functionality, hence the need to revive the non-stick coating.

WHAT DOES SEASON NONSTICK PAN MEAN?

When not cleaned well and taken care of properly, a nonstick pan deteriorates in quality, thanks to the buildup of stains. With time, some of the delicate foods begin to stick to the coating, making the pan less effective. Sometimes, dents on the bottom of the pans causes scratches that limits the functionality of your pan.

Seasoning a nonstick pan refers to the application of a layer of oil onto the surface of either a cooking or frying pan. You can use an oil of your choice such as vegetable oil or any other with a similar viscosity.

Seasoning utilizes a Chemistry principle called polymerization. When a layer of oil is applied to a surface, then heated until the oil emits smoke, the oil particles turn into plastic form, which bonds to the metallic surface of the pan.

Hence, the new plastic layer covers the dents, scratches, and stain present on the Teflon coating. Further degrading of nonstick properties stops, so as the possibility of rusting from the exposed metallic spots.

WHY SEASON A NONSTICK PAN?

There are several reasons why you ought to regularly season a nonstick cookware set. The most obvious reason is when there is obvious sticking of food on the pan unlike before when food slid right off the surface. With time, stains build up on the pan, interfering with the coating.

It is not only an old nonstick pan that should be seasoned. Even a brand new Teflon pan has first use instructions, among them a suggestion to first clean the pan, then season it. If you have been ignoring the instructions, then you should start reading them.

You are required to first rinse the pan in warm water, then dry them up with a paper towel. Once you are done, use a paper towel to apply either coconut or vegetable oil. Olive oil is not recommended since it smokes at low heat, creating dark spots that do not come off easily.

Rubbing the oil around the coated surface adds another coated layer. This layer acts as a barrier between the Teflon coating, food, and hard utensils. The result is a prolonged lifespan of your skillets, unlike when left unseasoned for the first time.

Fast forward to several years after first using your new Teflon pan, time takes a toll on the frying pan you have grown so fond of. Scratch marks form utensils become apparent, the bottom is dotted by black marks, dents are visible, and food sticks to the pan.

At this stage, it is now time for another round of seasoning. The frequency of seasoning to restore the pan to its original glory should be done at least twice in a year. The oil serves the purpose of creating a film that fills up the voids and dents, ensuring an even nonstick surface.

HOW TO SEASON A NONSTICK PAN?

Before you season a nonstick pan, it needs to be deep-cleaned. This first step ensures you get rid of the stains and food particles that are partially responsible for the lack on nonstick properties of late.

The best method of cleaning the pan is using a mixture of vinegar, baking soda, and water. Add a cup of water, half a cup of vinegar, and two tablespoons of baking soda to the pan. Then, light up your stovetop and place the pan on medium heat for about 10 minutes as the mixture boils. Take it off afterwards. Wash off the mixture using a gentle dish soap and sponge.

It is important to completely dry the pan before seasoning it. A paper towel or soft cloth is great for this task. Any impurities would prevent the oil from sticking to the pan surface. Begin reviving the pan by warming it on the stove top (emphasis is on low heat).

As the pan warms on the stove top, preheat your oven to 300 degrees Fahrenheit. The reason is to prevent temperature shock when a cold pan goes into an oven at 3000F. Basically, the idea is to bake the pan in the oven once it is coated with a layer of oil.

Once the pan is warm enough, apply a thin coating of vegetable oil on the cooking surface. Canola oil works well too. If you cannot find any of these, then a cooking oil rich in unsaturated fatty acid does the trick. Examples include sunflower, corn, flaxseed, and soy oil.

The exposure to oxygen inside the oven would then stimulate the fatty acids to polymerize. Some chefs recommend you apply about half an inch thick layer of oil, then transferring the pan to the oven for up to 2 hours.

The heat from the oven forces the oil to sync into the Teflon coating and bottom of the pan, creating an extra layer. One thing to consider is the oven-safety feature of your nonstick pan. Check the temperature which it can withstand, and for how long.

After the two hours, turn the oven off, and leave the pan inside until morning. If you are uncomfortable with the oven method, or your pan is not oven-safe, then a simple preheating of the pan on a stove top does the seasoning job.

Pay attention to medium heat and as soon as the oil starts to smoke, remove your pan. Allow the pan to cool down, and wipe off excess oil from the cooking surface. We would suggest your repeat the procedure on the stovetop several times in a day, in order to have a longer lasting seasoning.

CAN YOU DEEP FRY IN A NONSTICK?

The straight answer is no. The temperature and time duration required for deep frying ruins the Teflon pan. High heat degrades the Teflon coating when it reaches above 5000F. So, as long at the temperature stays below the 500 mark, then you are good, anything above that is catastrophic to you and the pan.

CONCLUSION

For the most part, nonstick pans are easy to clean. But, they still get scratches and stains during their service life. With time, grease, dents from stacking/temperature fluctuations, and tiny food particles build up on the bottom, hindering the performance of the nonstick bottom.

As a result, they become sticky, adversely affecting the efficiency of the surface. Luckily, a simple seasoning with vegetable oil over a medium heat stove top revitalizes its lost glory.

The trick is to first clean the pan thoroughly to get rid of any lodged stains. Then you can either use the baking method on the oven or heating on stovetops, allowing to cool, then wiping off excess oil.

Thank you read “How to Season a Nonstick Pan”

How to Make Panini without a Panini Press

Most recipes often call for specific cookware for the best results, however as things grow every day, creativity often takes the day. That’s the case with Panini because today, you can still have your sizzling homemade pieces even if you don’t have a Panini press.

If you have any heavy cookware, whether modern or ancient, bring it out because it will get the pressing for you. Here’s a detailed breakdown on how to make Panini without Panini press:

See more: How to Use Grill Press for Hamburgers

Tips on How to Choose the Best Cookware or Appliance to Use

As earlier highlighted, any heavy cookware can replace a Panini press, however the item you choose to use also depends on the fillings you’ll be assembling. Here’re a few tips to guide you:

  • Option 1: Skillet, Frying Pan or Sauté Pan

All these go well with sliced bread to be accompanied by fillings which stay in place such as sliced deli meats, sliced or grated cheese, vegetables or bacon. But with this, you’ll need an extra pan or anything weighty to press the Panini down effortlessly.

  • Option 2: Griddle

This works like the first options, so don’t even think about using fillings like shredded meat, crumbled cheese, shrimp or mushrooms. You’ll also have to get yourself something to press the Panini down. A plus here is that flipping the Panini is easier, considering that it has no sides.

  • Option 3: Grill Pan

The fillings to use are similar to those usable on griddle and skillet. However with a grill pan, your Panini will get nice grill marks making the slices more presentable.

  • Option 4: Toaster Oven or Regular oven

This is a more versatile option that goes well with any type of bread and depending on the size of your oven, you can actually make multiple pieces at a go. When it comes to fillings, avoid anything that won’t turn out well when slightly baked. So you can use juicy meats, vegetables or cheese and any other thing that can withstand the amounts of heat released in an oven.

How to Make Panini without a Panini Press

The standard procedure for making Panini without a Panini press is narrowed down into 4 simple steps as follows:

  • Preheat

The recipe works well with 2 cast iron skillets so to kick it off, preheat both pans over medium high heat.

  • Assemble

As the preheating is going on, try and save time by assembling the Panini together. This is now easier, especially with the right bread and fillings, which we have already discussed. If you’re planning to make several rounds, you can still assemble them at once, so that once you move to the next step, it gets easier.

  • Cook

With the pans and Panini all set, it’s time to get the cooking started. Grease (using any oil of your preference) one of the pans you’ll be using as the base on the inside, and that you’ll be using when pressing at the bottom. At this point all the pans will be hot, so you can keep your hands safe by using a paper towel to do the oiling.

Place the Panini slices on the bottom skillet, and push it down with the other pre-oiled set. For extra pressure, you can add another heat-safe cookware on top, especially if you’re doing two or more pieces at once.

Let this cook for about 3-4 minutes under medium heat, or until it’s golden and toasty enough to your liking. To get the other side ready, flip the Panini and apply the same pressure until it’s all-done. However if all the pans were hot enough, you won’t even need the flip.

  • Enjoy

When ready, carefully remove the extra weight and set the Panini aside. You can repeat these steps for a couple of rounds if you need to make more and your skillet is a bit smaller. Thereafter, you can enjoy it as a snack or with any accompaniment of your choice.

There you have it, the simplest way to keep the Panini joy going.

Panini Press Recipes

Panini Press recipes are the latest trend in cooking. You can make everything from breakfast sandwiches to dinners on your Panini Press, and you don’t need any special cookware or supplies. The only thing you really need is some breads, meats, cheeses, veggies and spreads. That’s it!

Here are some recipes for you to try out on your new Panini Press that are all very tried-and-true family favorites of ours. We hope you enjoy them!

Recipe 1: Cheesy Tomato Basil Frittata Sandwiches

Ingredients

  • 1/2 cubed cheese (sorry I don’t know exact measurements)
  • Directions   
  • Place the frittata mixture inside the sandwich. Top with remaining slice of bread.
  • Close the Panini Press and cook until browned, about 3 minutes per side.
  • Open press and serve sandwich with slice of tomato on top.

Yields: 1 panini (4 sandwiches)

  • Cook on Panini Press for approximately 5 minutes or until cheese is melted.

Recipe 2: Chicken Fajita Quesadillas Ingredients

  • 1/2 pound boneless skinless chicken breasts cut into strips (you can use pre-cooked chicken to make it faster)

Directions   

  • Heat a large nonstick skillet over medium heat; spray with cooking spray.
  • Add bell pepper, onion, and garlic; saute 4 minutes. Stir in chicken; cook 5 minutes or until chicken is done.   
  • Heat tortillas in the Panini Press. Top each with 1/4 cup cheese, about 1/2 cup chicken mixture, and about 2 teaspoons green onion; fold over.
  • Place on the Panini Press and cook for approximately 3-5 minutes or until cheese has melted.

Yields: 4 quesadillas (8 servings)

Recipe 3: Caprese Sandwiches Ingredients

  • Bread (we like to use ciabatta bread but you can choose whatever bread you like)
  • tomato slices
  • fresh mozzarella sliced
  • fresh basil leaves chopped or whole if small enough (optional)

Directions      

  • Spray both sides of the bread with cooking spray and toast in Panini Press for approximately 5 minutes per side.
  • Assemble sandwich by placing mozzarella slices on toasted bread, top with tomato slice, more cheese if desired, sprinkle basil leaves on top. Serve immediately.

Yields: 1 panini (4 sandwiches)

Recipe 4: Grilled Cheese Sandwiches Ingredients

  • Bread of your choice
  • American or Cheddar cheese sliced Directions   
  • Place cheese between two pieces of bread.
  • Lightly spray outsides of each piece of bread with cooking spray. Toast in Panini press until lightly browned, but still soft inside.
  • Serve and enjoy!

Yields: varies depending on how much cheese and bread you use.

  • Turn Panini press off and open. Place sandwich on one of the halves, close press, and cook for approximately 3 minutes per side or until cheese is melted completely.

Recipe 5: Chicken Sandwich with Caramelized Onions & Boursin Cheese Ingredients

  • bread (again we like to use ciabatta but you can choose whatever kind you like)
  • provolone wedges (the round ones)
  • caramelized onions (you could also buy those premade in a jar if you don’t want to do it yourself!)l
  • boursin garlic & herb cheese (you can get this at almost any grocery store and it is SO good!)

Directions:

  • Lightly spray outsides of each piece of bread with cooking spray. Toast in Panini press until lightly browned, but still soft inside.
  • Assemble sandwich by placing provolone wedge on the bottom half of the bread, top with caramelized onions and spread boursin cheese on top. Place other slice of bread on top and eat immediately!

Yields: 1 panini (4 sandwiches)

  • Turn Panini press off and open. Place one layer of chicken mixture on half of bread that’s facing up, then place second layer over first, close Panini press and cook for approximately 3 minutes or until hot.

Conclusion

One of the downsides of replacing a Panini press with your heavy cookware is that the results might not be as attractive. However, it’s still fast, easy and convenient for those who can’t lay their hands on descent Panini press brands.

When nicely done, you’ll realize that even the taste remains the same, which is definitely a plus. After getting the right skills on How to Make Panini without a Panini Press, you might find no need of investing in a Panini press anyway.

Thx Dreamcreate

How to Use Grill Press for Hamburgers

This article about How to Use Grill Press for Hamburgers, read more..

Nothing beats the joy and summer sizzle that comes with grilling from the comfort of your home. When the weather is a bit chilly, you might not have the luxury of using the huge grill stationed at the backyard, and with that you can turn to quick fixes like burgers. A grill press has several other names, so you might come across it as steak weight, hamburger press or cast iron press.

However, only one thing remains unchanged: it’s the only hack to perfectly-grilled hamburgers. This on the other hand equally depends on how best you can handle this gadget. So, if you have been having trouble catching up, here’s all you need to know about how to use grill press for hamburgers cooksillustrated:

Why Use A Grill Press?

Grill Press

You can never appreciate how key a grill press is unless you try making a number of patties by hand. You’ll see how much time and energy a single piece can consume; something you can solve using this appliance. With it, you’re guaranteed of perfect shapes achievable in just minutes. Basically, it does all the work, from shaping, pressing to grilling.

The better part is that it’s not only limited to hamburgers and as the name suggests, it’s basically great for grilling any type of meat.  At the same time, all these are only achievable when you have a quality and effective grill press brands.

How to Use Grill Press for Hamburgers

Divide. First determine the burger sizes you prefer, then dive the meatballs into the desired patty sizes. From each meatball, shape them further into big and smaller balls.

Press. You don’t have to use your bare hands here, so place the bigger ball in the press dish and create a depression by pressing using the smaller cap. Place all your seasonings in the depression and cover it up with the smaller meatball afterwards.

However, you have to be selective with the fillings or seasonings used here so that you don’t end up with delicate stuff which don’t go well with the weight of the press. Press the stack, making sure that you trim off the excess meatballs on the sides. You can cut down the number of times you have to press patty pieces by investing in a versatile brand that can handle two or more at the same time.

Cook. Place your patties on a preheated and seasoned grill plate, ensuring that the pieces are well spaced. Cover them with the grill press and let it cook to your perfection.

Things to Consider When Using a Grill Press

  • Pre-heat correctly

The best way to ensure that you get the plates ready in minutes is preheating them directly, over a medium heat. To have them ready at a go, you can heat them up side by side if you have several burners. With such, the heat will equally be retained longer, making the food get ready evenly.

  • Patty position

You need to space the patty in such a way that it evenly gets the heat from both the grill plate and the press. Otherwise, you’ll have to grill the sides in turns so that they get ready evenly. If you always make more, you should consider investing in a large-sized grill press to accommodate more pieces in a single round.

  • Monitor the cooking

The duration your patties take to get properly-cooked depends on how well you preheated the grill and also on the thickness. This is basically why the cooking time is estimated, so that you don’t end up with burnt or half cooked pieces.

Something to mention is that leaving the press on the food for long could also crush or smash whatever you’re grilling. Therefore, always remove it the moment you achieve your ideal sear.

  • Nature of steak

Now, a grill press is highly recommended for juicy burgers, but then before using it, here’s something you should know. As its nature, the pressure from the cast iron will certainly push most of the moisture out of the meat, which then leaves you with a delicious crust. Therefore, if you prefer your steak medium-rare and are not willing to sacrifice this juice, you can explore other options.

How to Clean & Maintain a Panini Grill, by Waring

Conclusion

The secret to a better-performing grill press is maintenance, considering that most of them are made with cast iron.

So, as you continue learning how to use grill press for hamburgers, you should also remember to season, clean and store the appliance properly before and after use. That’s the only guarantee to durability and efficiency.

How to Clean Stainless Steel Grill

Have you ever cleaned your grill, but the outcome still doesn’t look perfect? When buying a grill, you should first check whether it has cast iron grates or is a stainless steel grill. With the two, you’ll have to up your cleaning game for a more effective and durable grill. Stainless steel grills are protected with a layer of chromium oxide which corrodes easily the moment you allow layers of dirt to build up on the grill.

Clean Stainless Steel Grill

When this happens repetitively, the grill might not work properly. So if you own or is planning to buy one, this read on how to clean stainless steel grills will be of great help to you.

Four steps on how to a clean stainless steel grill

In order to have an easy time when cleaning, always clean every part of the grill differently as detailed in the steps below by BBQ expert Beefsteak Veg.

  • Clean the cooking grates

The cooking grates in a stainless steel grill are not different in any way from the rest of the grill ranges. They still remain to be the most messed-up part of a grill that equally needs to stay clean at all times because it’s where you place the food when grilling. You’ll realise that once you start cleaning and oiling the grates regularly, you’ll have minimal cleaning to do whenever you’re done for the day.

The easiest way to clean the grates is by setting them aside, and of course after they have cooled down. It also minimizes the chances of soaking up the whole grill all at once. You can choose to use home-made cleaners like baking soda paste, commercial grill cleaners or just use a mild liquid soap.

This will be guided by how dirty the grill is, and also how accessible the cleaners are. If you need any scrubbing done, use a wire grill brushor a scouring pad. Thereafter, rinse the grates with clean water and dry them with a clean cloth or paper towels.  Once they’re dry, remember to oil the grates, whether you’re planning to keep or use the grill afterwards.

  • Clean the insides

It’s not only the cooking grill grates and the outer surface that needs cleaning. You should also clean the stainless steel grill on the inside, because it also has some effect on the grill’s effectiveness. In there lies burners, flame tamers and venture tubes and all of them need to be cleaned more often to minimize build-ups from grease and food residues.

Flame tamers are what protect the burners by creating a barrier. This always has to be off before cleaning and for these, use a grill brush to remove any food residues, then wipe the remaining dirt with a paper towel.

The same can be used for different types of burners, except the ceramic ones. Venture tubes on the hand, can be cleaned with a rag soaked in soapy water or brushed with a tiny wire brush in case they’re clogged.

  • Clean the surfaces

With the surface, you have to pay attention to the products you’re using, unlike for the grates. I mean, it gets in contact with different elements, which makes it prone to stains. Contrary to popular belief, you don’t have to use expensive cleaners and stainless steel polishes to keep your grill surface clean.

You can also use warm soapy water and a clean rag to get the messes fixed. However, we have certain grill spray cleaners which also protect the grill from harsh elements, apart from keeping it new and clean. So, to some extent they still outweigh regular soap, provided that you buy from brands that are tried, tested and found to be effective.

The only things to avoid are abrasive or acidic cleaners and rough materials which could damage the grill’s fine finish. Use a damp cloth to gently wipe the entire grill and after rinsing off the soapy water and residues, dry the surfaces with a clean cloth. Leaving the grill with some traces of water is never a good idea, and plus, it makes the next step easier.

  • Polish the surface

We have been doing this on the cooking grates, but when it comes to stainless steel grills, you have to include the surfaces. Doing this isn’t just for the shine, but also to minimize direct build-ups on the grill surface, which might initiate stubborn stains.

You can opt for the affordable vegetable oil to polish every corner of the grill, leaving you with a perfect shine. You can also go for stainless steel polishing wipes for better results. Once you follow these steps to the latter, you’re guaranteed of a long-lasting, perfect-looking and effective stainless steel grill.

Summary

The shiny surfaces you often see on stainless steel grills require a little of effort for it to remain with the same clean, bright and sparkling look. Similarly, remember that irrespective of the name stainless steel, you still have to pay attention to any signs of discolouration, stains and rust.

Apart from regular cleaning, this can be prevented by regular seasoning and use of ideal cleaners. After doing all this, you should also find a grill cover for your stainless steel grill that will also keep it in the right shape, irrespective of how long it will be sitting unused.

DIY Chai Scented Candles

Updated January 16, 2021

Have you ever looked for Chai candles? Well I’ll spare you the search, you will never find one! Aside from going to India or ordering one off the internet with a questionable scent there aren’t many options….. Until today!!!! Rejoice!! This is very cheap, very easy, and if my hopes and dreams had a scent, this would be it! Dream it, create it!

Scented oil: Take two cups of vegetable oil (I used safflower), a teaspoon each of vanilla extract, cinnamon, cloves, cardamom, anise seed, and cut open a packet of chai tea. Grind up the spices in a mortar or coffee grinder, pour spices, vanilla, and oil into a jar and shake well!! Leave the jar on a window sill for a few days, shaking periodically, and add more spices to strengthen the scent as needed.

Strain the oil and prepare your candle holders by placing a wick in and securing it with some tape.

Melt wax according to instruction on your package (I used microwaveable soy wax from michael’s) and mix in scented oil until the desired level of fragrance is achieved. it should look like a light maple syrup. Add dye now if you like (I didn’t add any) and pour into candle holders, Let candles set for an hour or two.

You can also use the same method with other scents, use orange peel to make a citrus candle, coffee beans and coco powder to make moka, vanilla, chocolate, and cinnamon to make a Mexican chocolate candle. The possibilities are endless!

Cheers, Thx dreamcreate

Overlay Nails Vs Shellac: Which Is Better?

You always desire for both beautiful and healthy manicures, but usually, you win some, you lose some. After reading this article, you will be surprised to know that Overlay nails or Shellac nails can meet all your needs.

Overlay Nails Vs Shellac

What is Overlay Nail & Shellac Nail?

Overlay nail is kind of directly applied to the natural nails with acrylic or hard gel but skipping the extension step. It is usually shaped by hand or the forms, suit for people who fancy the natural manicures. 

Shellac is also a type of overlay nails but it is a brand name created by Creative Nail Design (CND). The combination of both acrylics and gels is in Shellac. It is similarly applied to the natural nails without filing or sculpting. 

Overlay Nails vs Shellac: What is the difference?

How do they look?

Overlay nails give your nail a natural look more than 90%. The overlay makes your manicures so strong, shiny and durable. 

On the other hand, Shellac nails are appreciated as absolutely 100% natural nails. Shellac applied on your nails will be thinner, more glossy than overlay nails.

Which will last longer?

Overlay nails, thanks to durability, last up to 3 weeks. They create a decent base, so women prefer to overlay it before applying the following layers. In contrast, Shellac nails are thinner than overlay so it will start to slough out after 2 weeks. 

Can you apply them by yourself at home?

Sadly, if you want Shellac manicures, you have to go out because the office CND Shellac just only provides service in salons. Instead,  you can buy products like Gelish for a close effect.

For overlay nails, you can find it easy to make at home. Just purchase the best quality nail polish, clean your nails, apply a base coat then one more glossy topcoat. 

How to remove them? Which one is easier?

Removing overlay nails is a little bit hard that you may make your nails painful. Firstly, you have to file your nails to 60-65% overlays with a hand file or electric file. Soak your nails in pure acetone with cotton pads and wrap them in aluminum foil for 20-30 minutes. Then, taking off the aluminum foils, scrape off the layer and file them again until all the paint is peeling off. 

Unlike overlay nails, removing Shellac nails is much kinder to your nails. Skipping all the filing process, soaking in pure acetone and wrapping it in aluminum foil in just 10 minutes and scraping off gently. Finally, clean them up again with cotton pads.

To sum up – Which is better?

Both overlay nails and Shellac have pros and cons, it depends on what you’re looking for. If you want natural, glossy, easy-to-remove-at-home nails, you can choose Shellac. If you are often exposed to housework, you should choose best overlay nails because of durability. All in all, this Overlay Nails Vs Shellac: Which Is Better? provide you enough information along with the difference between overlay nails and Shellac. Now, let’s choose the right one for you. 

How To Do Gel Nail Extensions At Home – A Complete Guide

A full gel nail extension manicure has always been part of women’s burning desire. Charming nails slightly reflect your real charisma, but not everyone is lucky enough to possess strong, beautiful nails america.

And so, I’ll give you this step by step instruction as well as some cautions on how to do gel nail extensions at home

First, you will need careful preparation to get gel nail extensions at home. Remember that all products are just worthwhile investment cause they will enormously benefit you several times. The supplies that you purchase will either make or break your success, so make sure you will choose the right ones.

Resource Gathering

1.   Nail lamp

2.   Acetone to erase the polish

3.   Cotton pads

4.   Nail polish soak off clips 

5.   Cuticle remover liquid

6.   Nail file

7.  Steel cuticle remover and cutter

8.   Nail clippers

9.   Cuticle clippers

10.  Nail buffer block

11.  Rubbing alcohol

12.  PH bond

13.  Gel nail polish 

How To Do Gel Nail Extensions At Home – A Complete Guide

Step 1:

Having gel polish on already, you need to divide the pads into 4 different pieces, and drench each of them well with acetone. Polish the top of each nail with a soft cloth, then use the cotton pads to protect your nails. After that, you can use the clips to hold it in the right position. Just keep it there for about 15 or 20 minutes. It’s time to enjoy your favorite TV shows and “let your hair down” a little bit.

Buff the top of each nail

Step 2:

After 15 or 20 minutes, scrap the clips and begin removing the gel polish by using the steel cuticle remover and scraper. The polish should be raised to a higher position and it should be easy to remove at this point. Use another cotton pad absorbed with acetone when removing polish.

Step 3: 

You need to apply cuticle remover liquid on your finger tip and spread this liquid over cuticles while gently pressing them. 

Step 4: 

Use best nail scissors that are usually curved to cut your nail fingers, rub smoothly on top of your nails to remove the top layer of your nail. This step plays an essential role in making the gel to attach firmly to your nails.

Step 5:

Washing your hands carefully with water (no soap), you will also pay attention to all of the dead skin and if necessary, just exfoliate it. The nails are required to be extremely clean. You can apply some drops of  the PH Bond to make your nails dry much better.

Step 6:

Spread the layer of the base coat gel polish very sparingly onto your nails then treat them with preferable heat (not that too boiling hot or  heat can destroy the whole process). I remember that I wasn’t able to control the heat well and it turned out to brmatic downfall. I have learned my lessons and hope you guys can fine-tune the temperature wisely.

The PH Bond

Step 7:

Apply another coat of gel polish (as thin as you possibly can!). After getting the polish on your skin,you will need a cloth with acetone to remove completely gel polish. If you happen to get gel polish, don’t worry, just use some toothpicks to erase the small amount of cuticles. The bottom line is to make sure that your cuticles are devoid of gel polish or they will start to peel much, much faster. Treat the polish with heat for 120 seconds to preserve it well. There is one thing I must remind you that Some lighter polish requires another 3rd layer, and if so, re-do this for about 90 seconds.

Step 8

You need some cotton pad rubbing alcohol to spread the liquid over your nail while pressing them gently. You’re done! There is no need to long for the it to dry completely and you can handle your daily chores without the fear that they will destroy your beautiful manicure

Your desired nail set

Some quick notes to doing gel nail extensions at home

  •  Trust me, no one is successful at doing manicures right in the first time! Practice makes perfect. Be patient and read the whole process carefully, you will start to gain valuable experience over the period of time.
  • Peeling process can always happen a few times because you have misunderstood some steps, again pay meticulous attention to the whole process. Remember, I just thought I wasn’t cut for doing manicures and give up them for 3 years. I promise with you will be a truly at-home gel nail expert shortly with above-mentioned steps.
  • It is very inadvisable to keep nail extensions for a long time. Let your nails unwind completely after application.
  • If you used acetone to erase a previous gel polish,  your cuticles are probably dried out. In this case, cuticle oil can solve this problem. But, remember to wait at least 1 minute after wiping off the sticky layer before spreading the cuticle oil. At first, I didn’t know that tip so I just applied the cuticle oil right after rubbing the tacky layer, and the top coat turns out to be a big mess
  • It is inevitable that damages will sometimes occur, if so, use a drop of glue to protect your nails. I highly recommend using fresh polish to bring your nails back to their finest state
  • Keep away from severe soap or toxic chemicals and moisturize your lovely nails with hand cream often. Hand cream protects your nails and prevents them from peeling off. 
  • DO NOT crack or peel the gel nails off.

Conclusion

A detailed guide on how to do gel nail extensions at home has been covered in this article. After all, just pay attention to what product you are using and these comprehensive steps, you can do gel nail extensions right at your home spa. Good luck! Dreamcreate

What Is A Nail Overlay? Guide And Some Types Of Nail Overlay

A beautiful set of nails will help increase your charm. According to Asian philosophy , a woman who owns a beautiful set of nails is always wealthy and lucky. Nowadays, there are many ways to beautify your nails and the most common way is to use overlay. What is a nail overlay? Scroll down to find some interesting information.

What Is A Nail Overlay?

A nail overlay is a beauty process of the nails with no extension of length.  To improve strength and durability, the manicurists will directly add a mixture to the nail.

Nail Overlay

Some Basic Types Of Nail Overlay

Overlay not only beautifies your nails but  also makes your nails harder. Currently, there are three basic types of nail overlay for everyone as Acrylic, Gel and Shellac. Depending on your preference, you can choose the right overlay.

Acrylic

Acrylic nail ingredients include powder and liquid polymer so they can be incorporated with nail polish or other nail accessories.

Due to exposure to air, acrylic nails will gradually harden when manicurists paint on the nail. 

Acrylic nail has long durability. It lasts from 2 weeks to 1 year if you maintain your nails at the salon. Do you want acrylic nails? Let’s take a look at its pros and cons to have a thorough understanding

Pros

  • Acrylic nail is cheaper than other types.
  • You can fix Acrylic nail by yourself if it is broken.
  • Acrylic nails durability is longer than others.
  • You can remove acrylic nails at home without manicurists.

Cons

  • Acrylic nail does not look real as other nails.
  • Ingredients in acrylic nails can be harmful if you inhale.
  • You have to go to the salon to maintain nails regularly.

Gel

Gel nail is made of some layers of gel and you can choose each color layer. To dry the gel, a manicurist will use UV light or LED nail lamps for 2-3 minutes.

gel nails

Gel nail durability is not as long as Acrylic nail. It can last for 2 weeks.

Scroll down, you can know some pros and cons of Gel nail.

Pros

  • Ingredients in the Gel nail method are very safe.
  • Gel nail looks more real than Acrylic nail.
  • The scent of gel nails is very pleasant.
  • Gel nails do not require maintenance at the salon.

Cons

  • The durability of Gel nail is short.
  • You will have to go to the salon to fix and remove Gel nails.

Shellac

Shellac is a product of Creative Nail Design company. It is a mixture of gel and nail polish.  So Shellac owns the pros of Acrylic nail and Gel nail.

This product can be used in the same way as regular nail polishes for your nails. To dry Shellac, you need to use UV light.

Your nails will look natural and shiny with shellac. Like Gel nail, Shellac only lasts for two weeks. You will have to go to the salon if you want to keep them longer. Plus, if you want to use shellac for your nails, you should read the information below.

Pros

  • Shellac looks more beautiful and realistic than others.
  •  Shellac creates natural beauty with high gloss.

Cons

  • You can’t use Shellac to increase the length of your nails.
  • Shellac cannot be used for weak nails
  • The cost of using shellac is higher than the others. 
Shellac

Tips To Use Overlay 

To protect and take care of the overlay you should:

–  Never use harsh detergents directly with your hands.

– Always keep nails clean.

– Use a moisturizer for both hands and nails.

– Come to the salon regularly to take care of your manicure.

Conclusion

Owning beautiful and healthy nails will increase your attractiveness. And nail overlay will help your nails look beautiful and charming. I think you can get the answer to the question “what is a nail overlay?” after reading this article, right? I hope you will have an interesting manicure experience. And now, it is time for you to head to the nail salon to give your nail a new and stunning look!